Motivation#
After five years of working as a frontend developer, I finally felt confident and motivated to share my knowledge and opinions with the world. Over the last two years, I've accumulated numerous ideas and drafts for talks, presentations, and articles. I've honed my English skills and realized that writing technical content comes naturally to me. The next step was deciding how and where to publish my content.
With Twitter becoming an impression-farming click-baiting shitshow and Medium filling half of my screen with paid subscription promotion, there wasn't any other option for me but to build my own blog the way I want it to be. I want to own my content, distribute it for free, and not be too dependent on any platform or tool.

MVP functionality#
I started writing the code and exploring available tools for my goal right away. My vision was broad and not really clear - I wanted a blog that featured a brief introduction about myself and offered content-rich articles with images, videos, code examples, and more. This vision evolved as I learned more and achieved small victories along the way. I was determined not to settle for anything mediocre; my goal was to build a blog that looked and felt appealing enough for me to enjoy reading long articles on it.
Here is the final set of things that I considered as required to be done before I announce and get my blog out to the world:
- Visually attractive, minimalistic UI, adapted for mobile phones
- Small about section with social links
- Posts that are statically generated from MDX files with a result of a Notion-like layout
- Dynamic table of contents for each post with an active section highlighting
- Fully functional comment section with social login through 3rd party provider
- Code snippets with syntax highlighting
- Dark mode
- Likes and views counters
- Easy deployment, minimal maintenance
- Analytics with SaaS integration
- Error tracking with SaaS integration
- Basic monitoring of the instance running in the cloud
How this blog is built#
Visual design#
Before all the technical stuff, I want to highlight how unexpectedly difficult it was to create the visual side of this blog. I've always known that UI designers' work is pretty hard and challenging, but the situation when you have a blank sheet and you need to start building something that looks attractive was something special to me.
I had no idea how I wanted my blog to look, so I looked for some references. Glenn Reyes's blog, inspired by Tailwind's Spotlight template, was one of the first ones I found. Ekom Enyong's blog helped me finalize some details of the post page, including the table of contents and post header.
I gravitated towards a simple yet pleasant and contrast look. After experimenting with some color schemes and even trying to fit my favorite Catpuccin theme, I ended up defining a custom color scheme with one contrast color similar to Dan Abramov's personal blog.
React and Next.js as a foundation#
For the technical foundation of my blog, I chose React and Next.js. React was a natural choice for me due to my familiarity with it, while Next.js intrigued me as a powerful framework for server-side rendering and static site generation. Next.js provided flexibility in customizing the build and deployment process, offering file-based routing and a convenient architecture with layouts and pages.
However, my experience with Next.js had its ups and downs. While I appreciated its customizability, I found some areas of the documentation lacking in clarity. The existence of two major versions (app router and pages router) added to the initial confusion. Nevertheless, I persevered and eventually harnessed the power of Next.js for my blog.
AWS Amplify for deployment and monitoring#
Vercel seemed to me like an important piece of the frontend industry puzzle that I had been missing, similar to Next.js. The first versions of my blog were deployed with ease with Vercel, but later, I decided to move to AWS. I had two reasons for that. The first one is that I already had the base-level certification for AWS (Cloud Practitioner) and I wanted to continue my path towards more complex certifications. I didn't have any chance to do that aside from the regular work, and the blog seemed like a great fit. Up until the end of the development process, I had set up both AWS and Vercel deployment, and that allowed me to explore their differences. The second reason why I chose AWS over Vercel was that I imagined this blog serving as a playground for me to explore different subjects of software engineering, leaning towards full-stack development. All these ideas require fully capable cloud infrastructure, so I decided not to waste my time on half-measures or to have trouble integrating my frontend app hosted on Vercel with other parts of the system hosted on AWS.
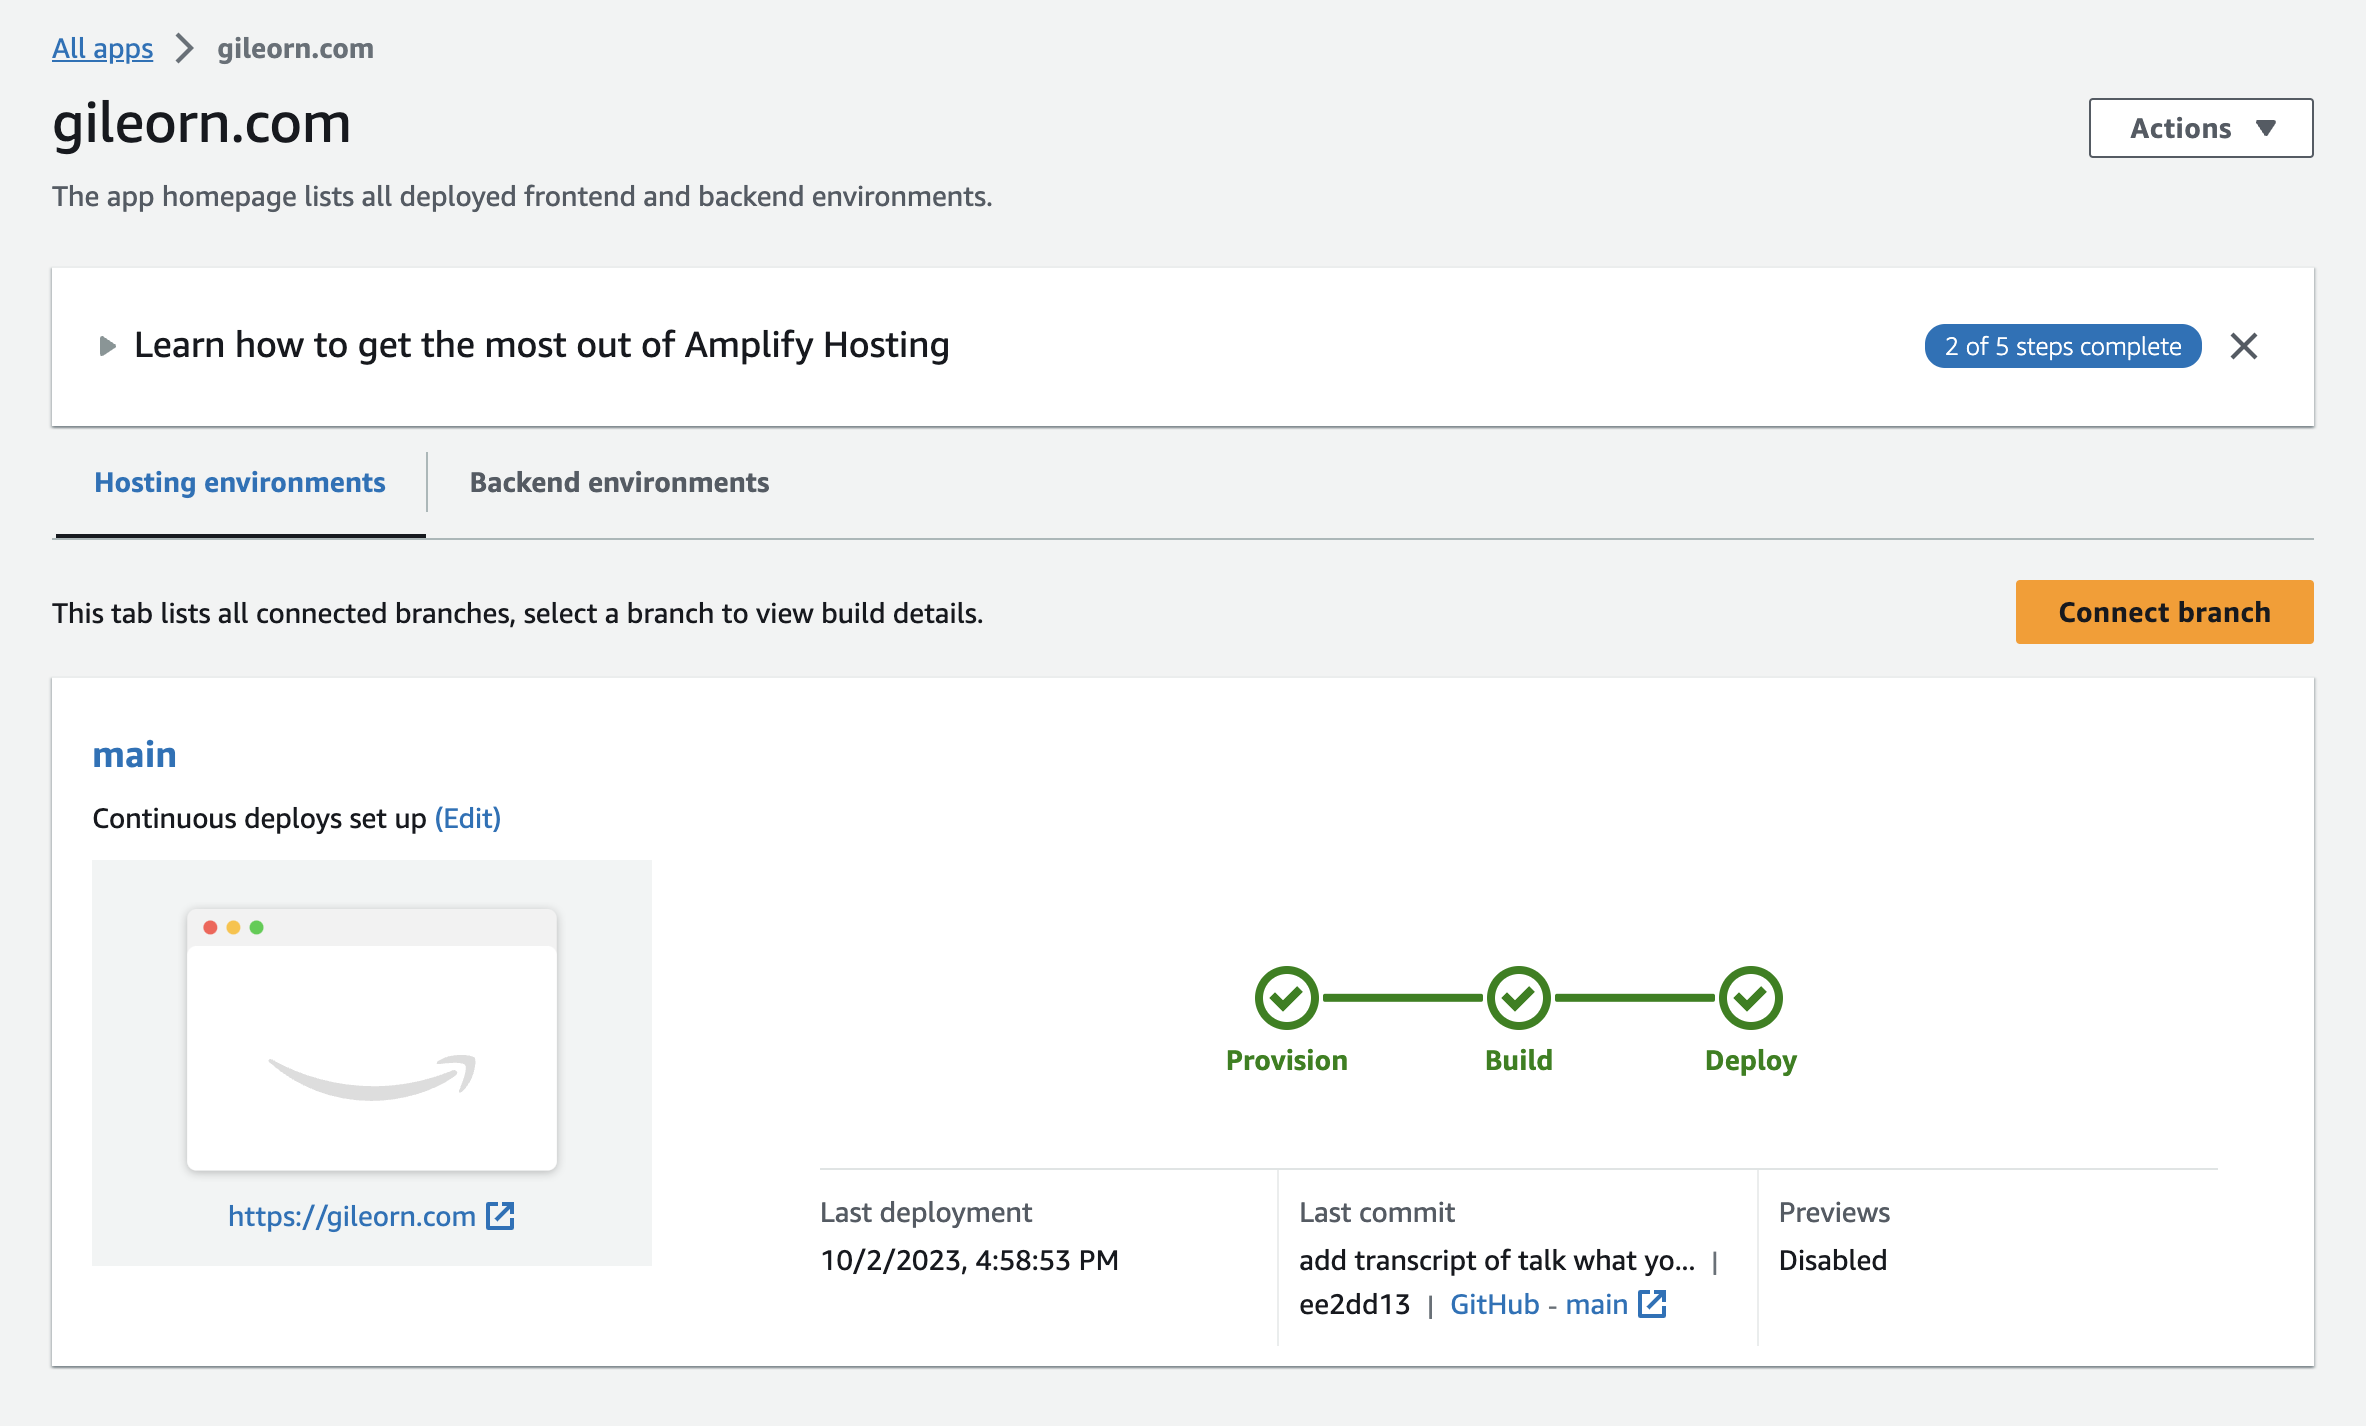
Being familiar with AWS platform, I was pleasantly surprised with their answer to Vercel - AWS Amplify. It was very easy to set up deployment, just like with Vercel. All the details related to Next.js were automatically detected, and the deployment simply worked. I bought the domain gileorn.com with AWS Route 53, and the integration with Amplify was as easy as you might expect.
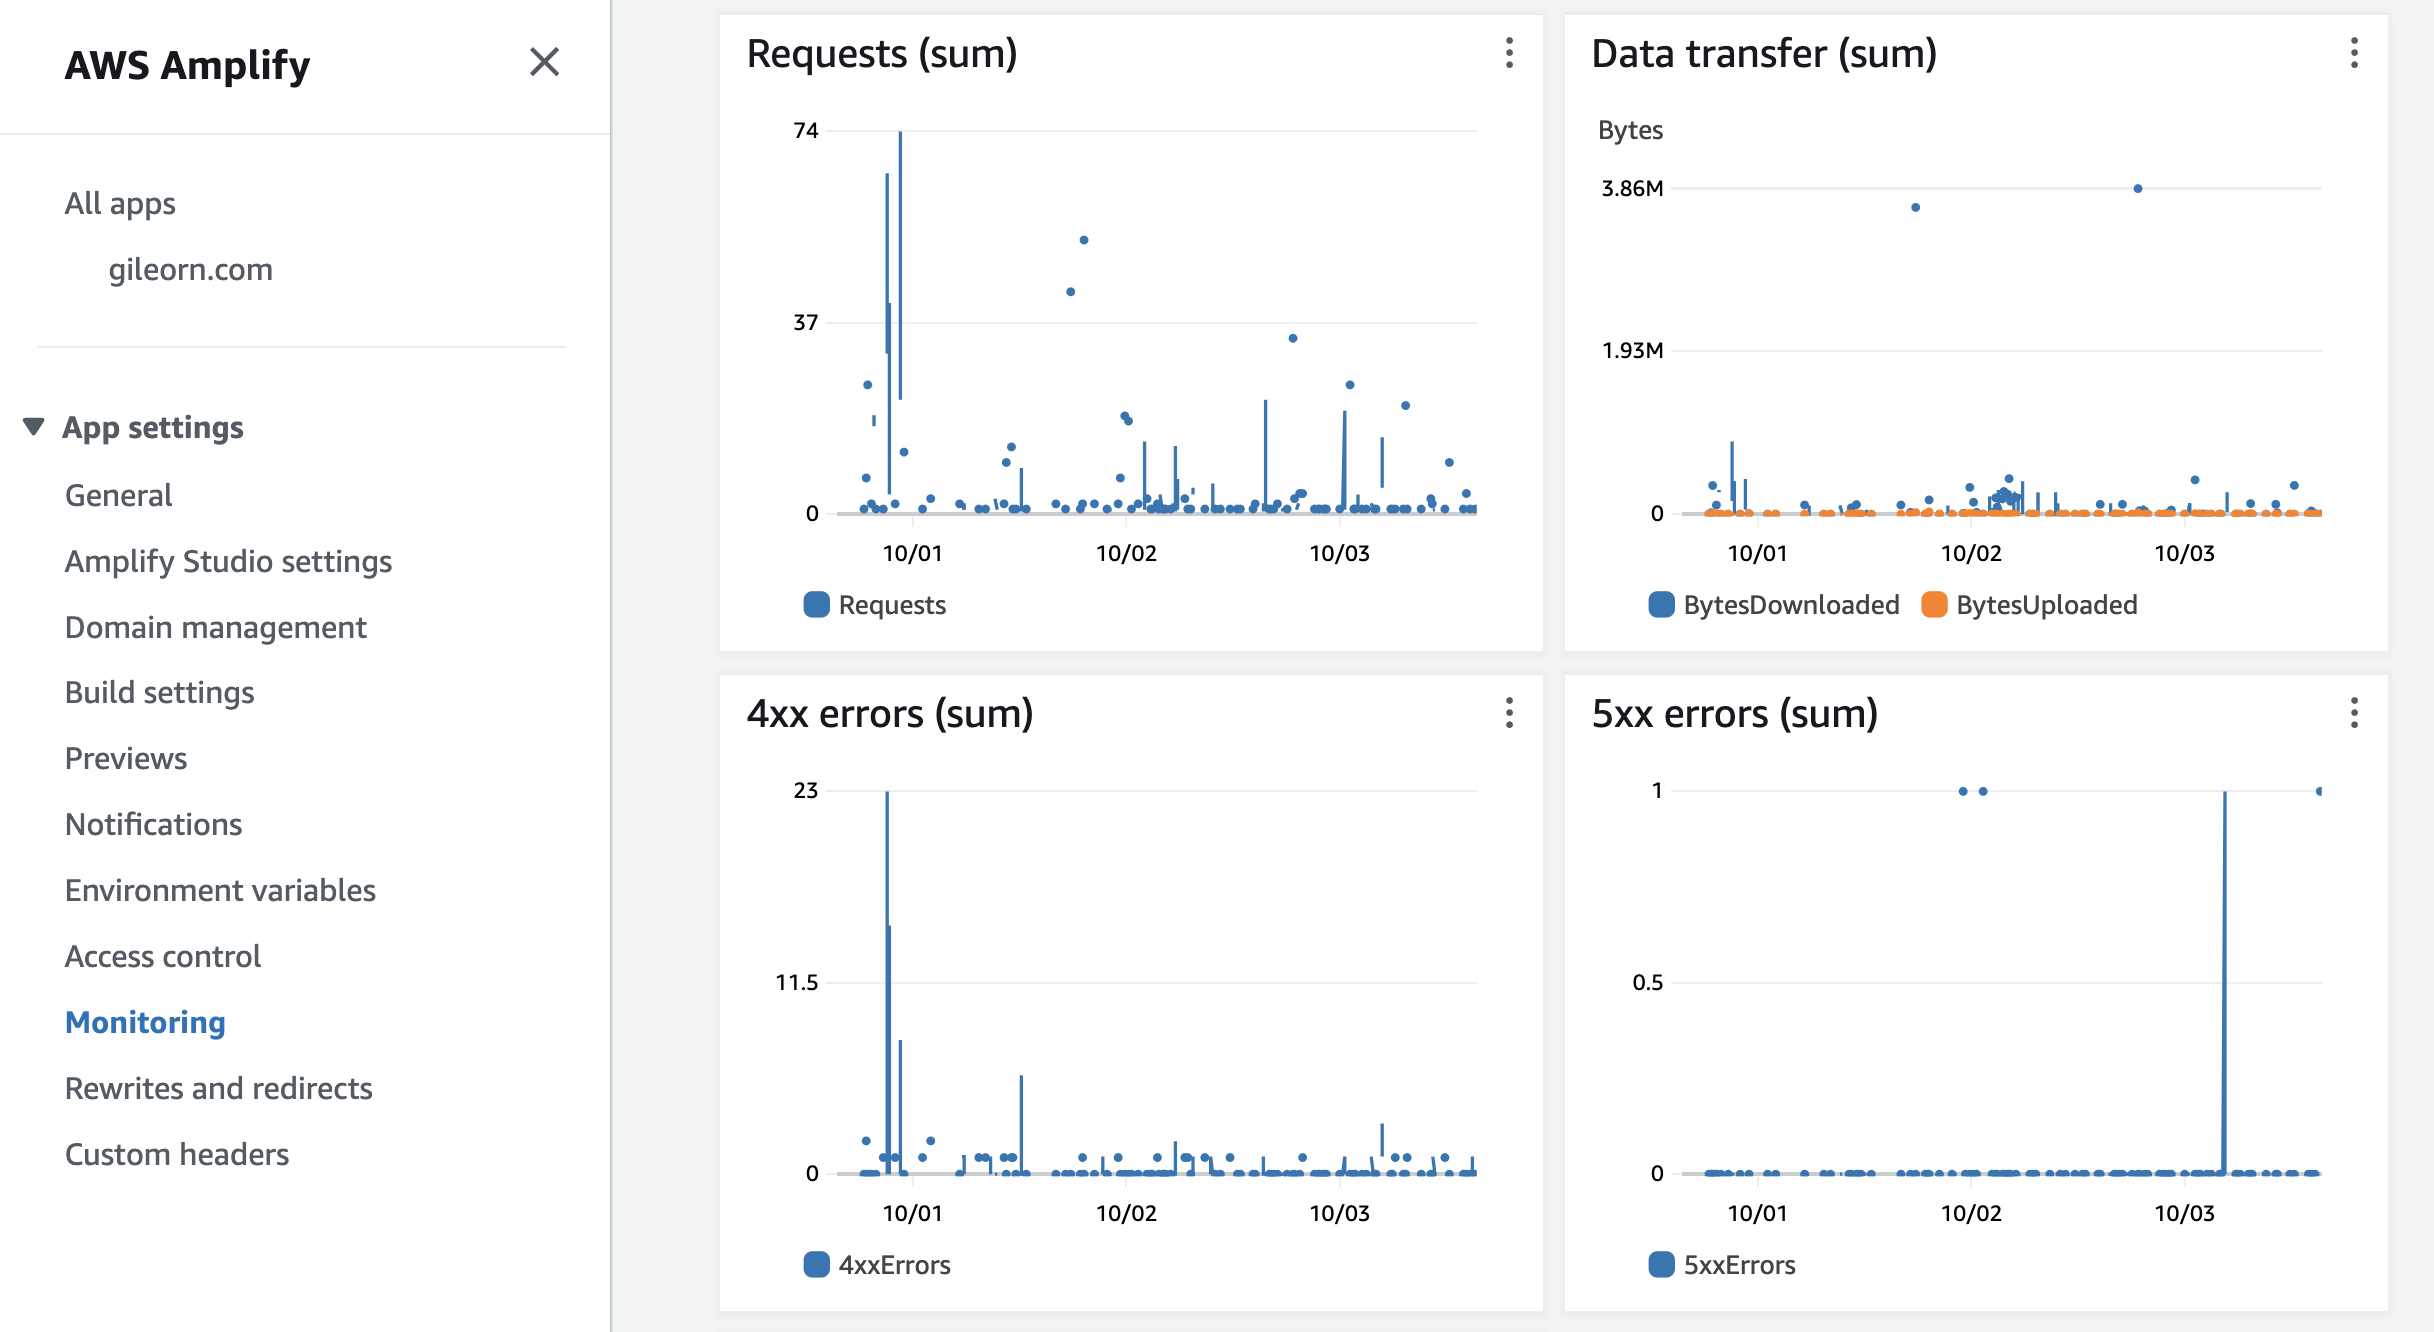
The next discovery happened when I wanted to set up basic monitoring of the running application: number of requests and response codes. With AWS Amplify, everything started working out of the box with the dedicated monitoring tab in the Amplify console that included a simple AWS CloudWatch dashboard with 5 graphs. It was all I needed at this point. And with Vercel... well, I needed to 1) switch to PRO plan (20$ per month) 2) buy a "monitoring" add-on (10$ per month per user). And they don't even have some preview, trial, or limited data access, so I could understand what's under the paywall and if I want it or not. As you can probably guess, at this moment, I was thinking that moving from Vercel was the right decision.
Tailwind for styling#
Tailwind was another thing I had yet to try. The utility classes concept was familiar to me, but I've only encountered some custom implementations of it and haven't seen any project taking full advantage of Tailwind.
As a new Tailwind user, I spent a lot of time consulting the docs to understand what class I was searching for, its fundamental principles, and the different ways I could customize my setup. One of the first things I tried to solve was the following use case:
I wanted my color scheme to be in one place and easily customizable without doing mass-replaces across the whole codebase and (of course) accidentally affecting the things I wanted to stay the same. I also wanted to avoid bloated classname strings that I sometimes see in the source code of some projects, making me question the whole atomic CSS movement. For me, seven classes is the threshold at which it becomes hard to read and maintain.
<!-- Hardcoded color values, easy to forget about dark theme support -->
<div class="text-zinc-50 dark:text-zinc-800"></div>
<!-- Custom color values that are easy to change in one place -->
<!-- But it is still easy to forget about dark theme support -->
<div class="text-m-main dark:text-m-dark-main"></div>
<!-- This is what I want to be equivalent to what's above -->
<div class="text-main"></div>
To achieve that, I declared a set of custom colors with a prefix 'm-' to avoid any naming conflicts.
// tailwind.config.ts

import type { Config } from 'tailwindcss'
import colors from 'tailwindcss/colors'

const config: Config = {
  darkMode: 'class',
  theme: {
    extend: {
      colors: {
        // text and base colors
        'm-main': colors.zinc[800],
        'm-dark-main': colors.zinc[50],
        'm-accent': colors.indigo[400],
        'm-dark-accent': colors.indigo[300],
        'm-secondary': colors.zinc[500],
        'm-dark-secondary': colors.stone[300],
        // background colors
        'm-background': colors.zinc[100],
        'm-dark-background': colors.zinc[700],
        'm-foreground': colors.white,
        // ... and so on
      },
    },
  },
}
These custom colors were used to create new tailwind primitives that are easy to use and maintain.
/* globals.css */

@tailwind base;
@tailwind components;
@tailwind utilities;

@layer utilities {
  /* --- text --- */
  .text-main {
    @apply text-m-main dark:text-m-dark-main;
  }
  .text-accent {
    @apply text-m-accent dark:text-m-dark-accent;
  }
  .text-hover {
    @apply hover:text-m-hover dark:hover:text-m-dark-hover;
  }
  .text-secondary {
    @apply text-m-secondary dark:text-m-dark-secondary;
  }

  /* ...the same approach for background, hover effects, etc... */
}
So, in terms of the code, this is what I ended up with. Below is the PostHeading component you see at the top of this page.
export const PostHeading = ({ post }: { post: Post }) => (
  <div className='text-center'>
    <h1 className='md:text-5xl text-4xl md:px-14 font-bold text-accent mb-4'>
      {post.title}
    </h1>
    <div className='text-secondary mb-1'>
      Posted on {format(parseISO(post.date), 'LLLL d, yyyy')} • {post.readTime}{' '}
      min read
    </div>
  </div>
)
I don't believe that any of the things I mentioned above require Tailwind. I could've done that even easier with custom CSS variables. But still, Tailwind seems to me like a no-brainer for styles in small projects because of the ease of use and developer experience it provides. I feel like Tailwind saved a lot of time for me in the early stages of prototyping this blog.
Contentlayer for posts management#
I wanted to use something other than CMS for data storage and WYSIWYG editor for creating and editing posts. The new MDX file format is a great way to have posts near the code, keep them under the version control system, and use markdown syntax. Moreover, MDX allows the usage of JSX and custom React components right next to the regular markdown content.
Out of all available options of MDX support for Next.js (including built-in support), I chose Contentlayer library because of its concise API, good support and ease of use. Below is an example of defining a Post content source coming from a specified location with a set of fields, optional and required.
import { defineDocumentType, makeSource } from 'contentlayer/source-files'

export const Post = defineDocumentType(() => ({
  name: 'Post',
  contentType: 'mdx',
  filePathPattern: `**/*.mdx`,
  fields: {
    title: { type: 'string', required: true },
    date: { type: 'date', required: true },
    description: { type: 'string', required: false },
    tags: { type: 'list', of: { type: 'string' }, required: false },
    teaser: { type: 'boolean', required: false },
  },
  computedFields: {
    url: {
      type: 'string',
      resolve: (post) => `/posts/${post._raw.flattenedPath}`,
    },
  },
}))

export default makeSource({
  contentDirPath: 'data/posts',
  documentTypes: [Post],
})
The above-defined fields can then be initialized in the heading section of any MDX file, as shown below.
---
title: Create your own developer blog from scratch with React and Next.js
description: Step-by-step walkthrough of how I created a smiple static blog with React, Next.js, Tailwind.css and Contentlayer
date: 2023-10-05
tags: ['React', 'Next.js', 'Tailwind', 'AWS', 'Vercel']
---

...all the other content
To add code blocks with full syntax highlight for different languages, I used Contentlayer's integration with rehype html processor and added rehype-prism-plus plugin that uses prism syntax highlight tool. I also want to mention this great repository for inspiration and examples.
import { defineDocumentType, makeSource } from 'contentlayer/source-files'
import rehypePrism from 'rehype-prism-plus'

export const Post = defineDocumentType(() => ({
  name: 'Post',
  contentType: 'mdx',
  // ... the rest of post config
}))

export default makeSource({
  contentDirPath: 'data/posts',
  documentTypes: [Post],
  mdx: {
    rehypePlugins: [[rehypePrism, { ignoreMissing: true }]],
  },
})
Supabase and PostgreSQL for storing likes and views#
A blog without a like button, without a proper view counter? Not for me. In my eyes, this was the most challenging part before I started any development. Even though I had many attempts to become more familiar with the database world, it never stuck in my head for long, and after all, this subject remained mysterious and difficult. And I have to say that connecting a database with views and likes count for posts was a lot easier and more straightforward than I expected.
Since I've been following the trend of "check out the most trendy tools that I haven't used before," the choice of database was pretty obvious - Supabase. This DB is often mentioned with Next.js in one sentence, and the promise of good developer experience was appealing to me.
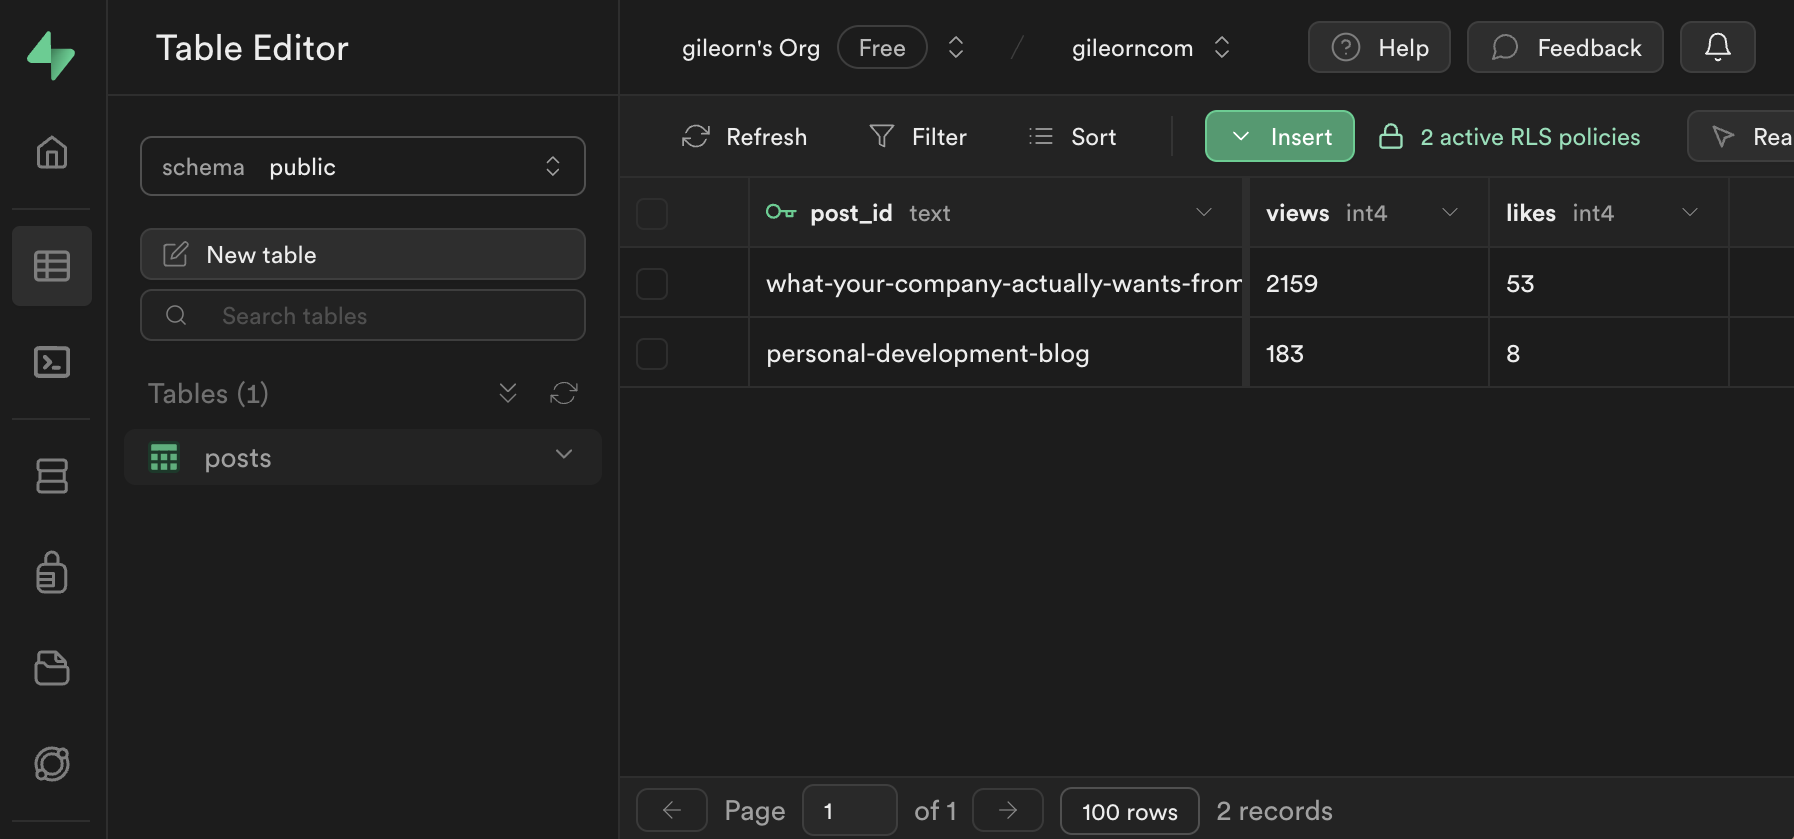
A basic connection to db was fairly easy to do. The following code snippet initiates the client-side DB instance with the secret keys stored in environment variables. The passed Database type can be generated in the Supabase UI, downloaded, and placed near your other DB files. This type generation can be automated, but since I have only one table with several columns, it sounded like an overkill to me.
import { createClient } from '@supabase/supabase-js'
import { Database } from './dbTypes'

export const supabase = createClient<Database>(
  process.env.NEXT_PUBLIC_SUPABASE_URL as string,
  process.env.NEXT_PUBLIC_SUPABASE_ANON_KEY as string,
)
After exploring several approaches, I found that the easiest way to make a query to DB from a React component is to convert it to an async server component, which resulted in the code below.
export const PostsList = async () => {
  const { data } = await supabase.from('posts').select('*')

  return (/* ... */)
}
With that, I got the data about views and likes. The next step was to add the ability to change these values. Both likes and views are counters, meaning they must only be increased by 1, while all other options should be prohibited. Not only that, this increment logic should be stored on the database side since we cannot trust the client or the server. This sounded like a non-trivial task to me, and google didn't help at all, until I found this great video.
Long story short, this type of problem indeed is solved on the DB side by defining custom functions written in plpgsql language (Postgres' SQL extension).
declare new_views int4;

begin
  select views
  into new_views
  from public.posts
  where post_id = postid;
  new_views = new_views + 1;
  update public.posts
  set views = new_views
  where post_id = postid;
  return new_views;
end;
This function should then be invoked from the client as an RPC.
const incrementViewsCounter = React.useCallback(async () => {
  const { data } = await supabase.rpc('increment_views', {
    postid: post?._raw.flattenedPath,
  })

  if (!data) return

  setViews(data)
}, [post])
Giscus for comments#
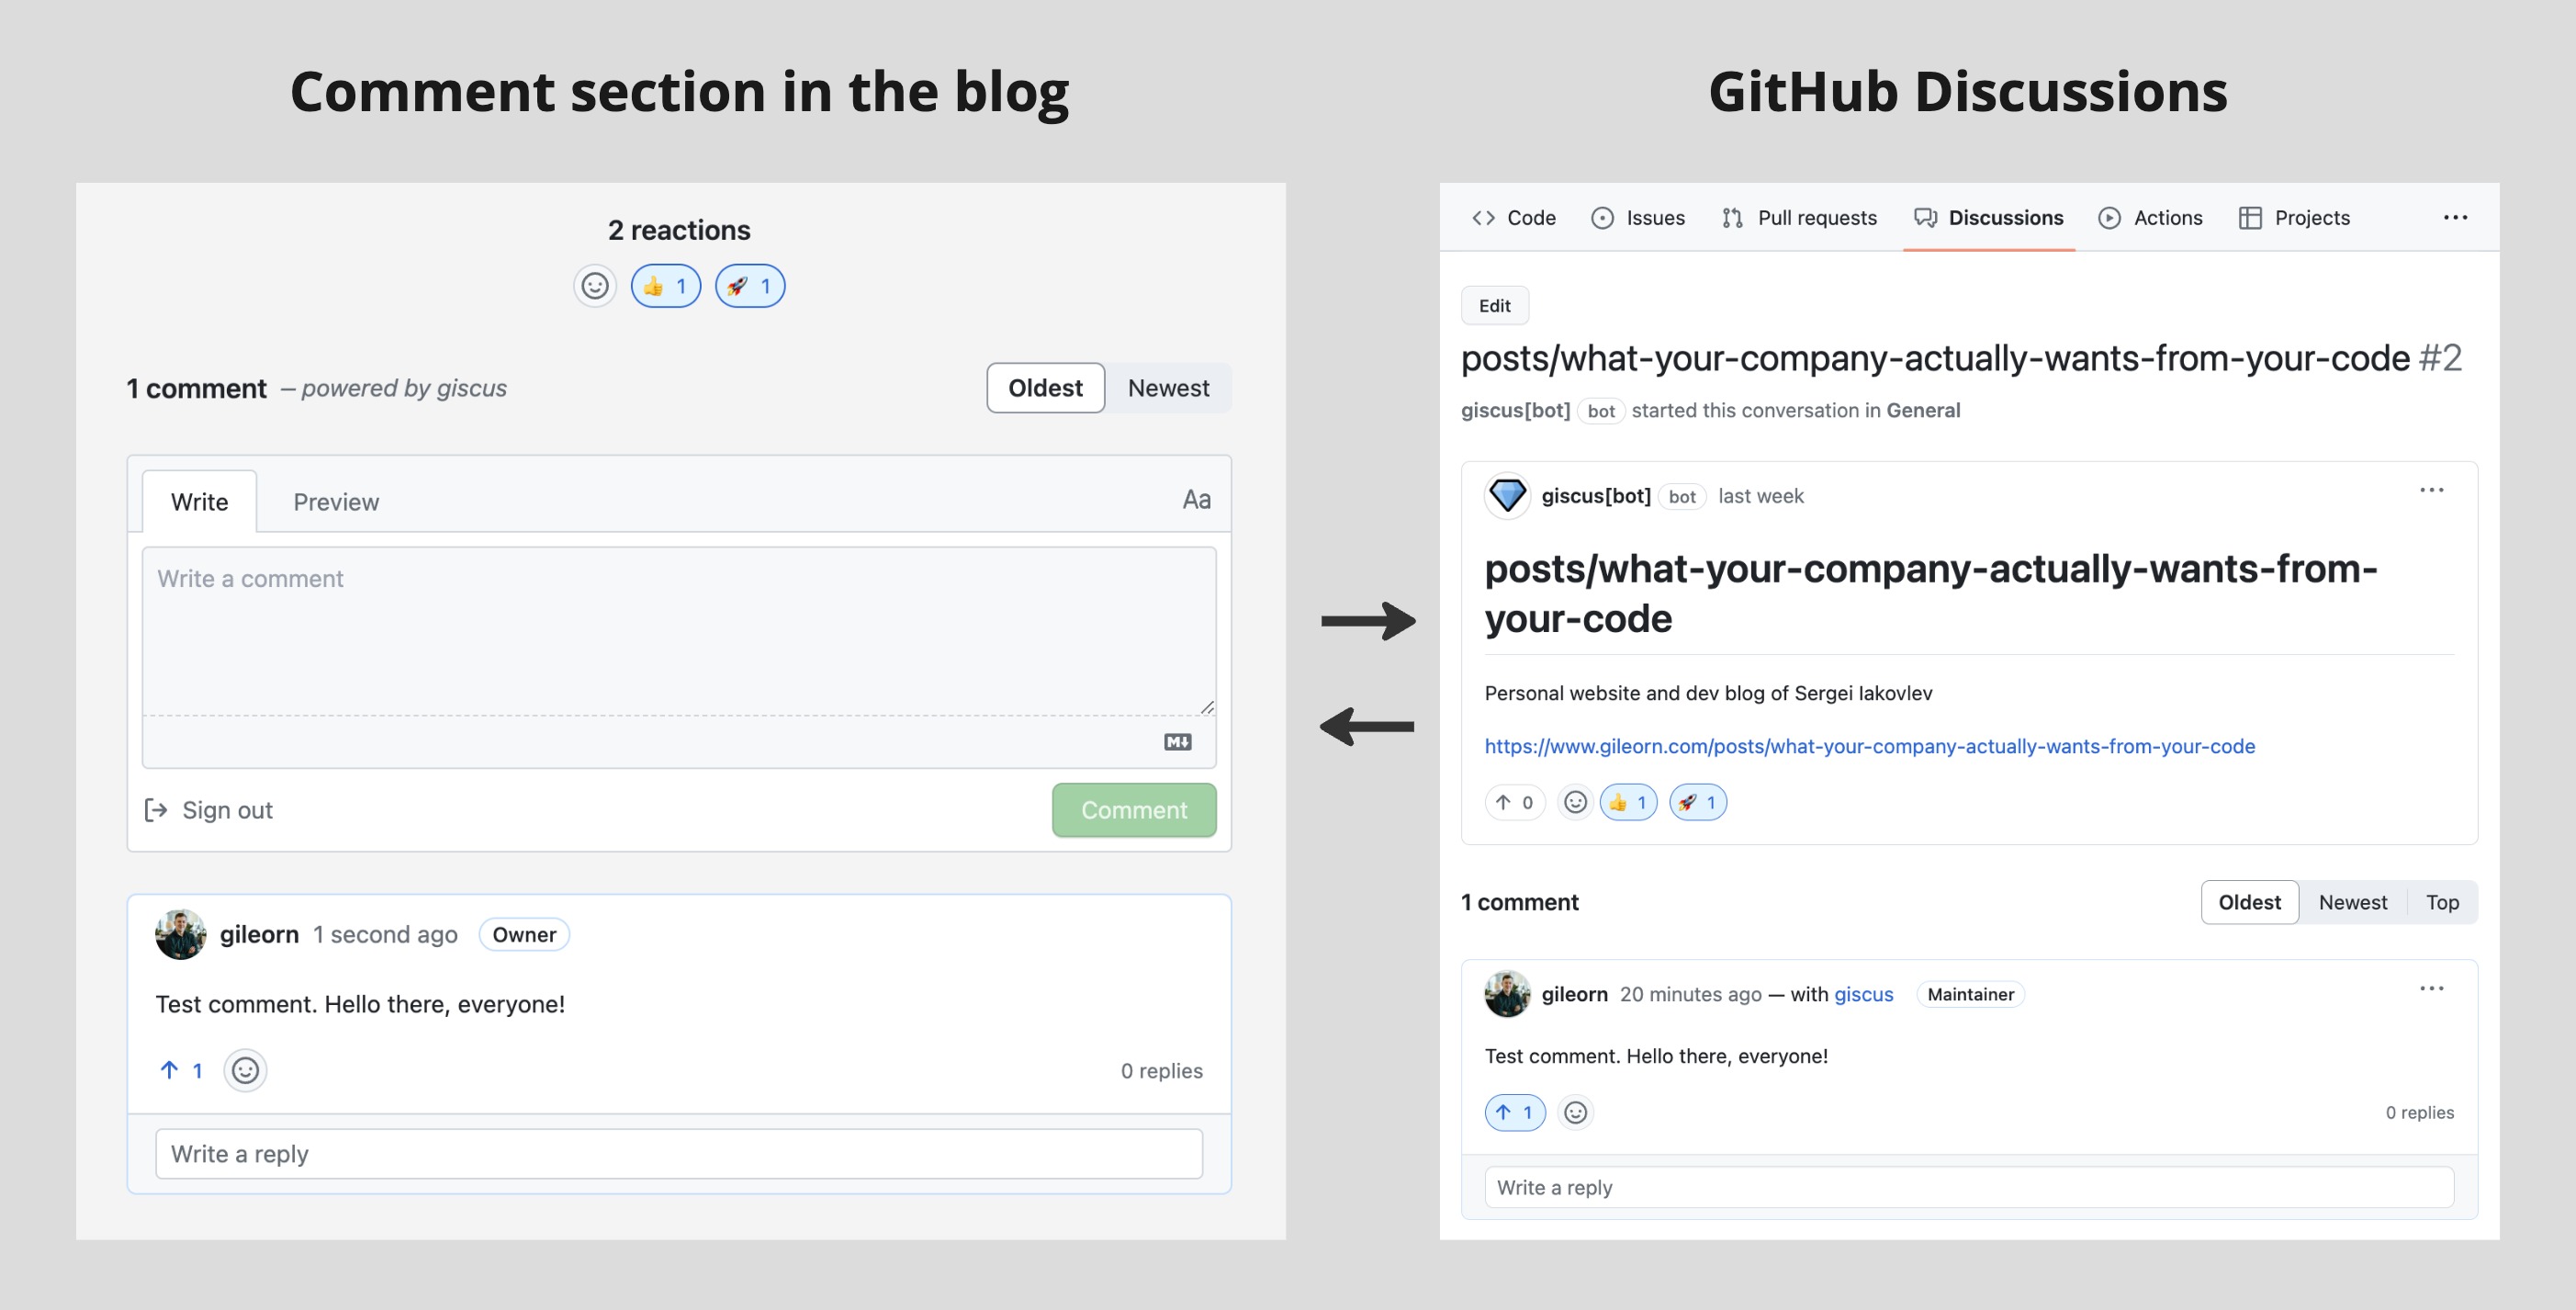
Comments seemed like one of the most resource-consuming things to build if we're talking about an MVP of a blog with limited use of database resources. Giscus was such a relief for me when I first found it. It wraps the GitHub Discussions API to provide a very convenient way to integrate comments and reactions for your blog with GitHub authentication. And there's a dedicated npm package for React that made the integration even easier.
Highlight.io for error tracking#
Error tracking is essential; I couldn't launch this blog without it. With me being very angry and dissatisfied with Sentry, disappointed with Datadog's documentation, and not (yet) ready to invest any time exploring tools like SigNoz, I just followed the advice of Theo T3 and decided to check out Highlight.io. The fact that this tool is open-sourced, it has a good free tier, and it is possible to self-host it convinced me enough to at least give it a try.

This tool feels fresh, simple, and powerful. It has everything I need and not much else (except useless AI integration, just like Sentry). Integration for Next.js was very easy and straightforward. Also, I was pleasantly surprised to find out that their free tier even has a good enough quota of session replay feature, and it works really well! This is just what I needed for my blog.
Plausible for analytics#
On the analytics front, I need basic stats with easy integration to my Next.js app. I had seen Plausible several times while exploring the web on the previous subjects. The promise of a "lightweight, open-source, self-hosted analog of Google Analytics compliant with GDPR" sounded just right for me.
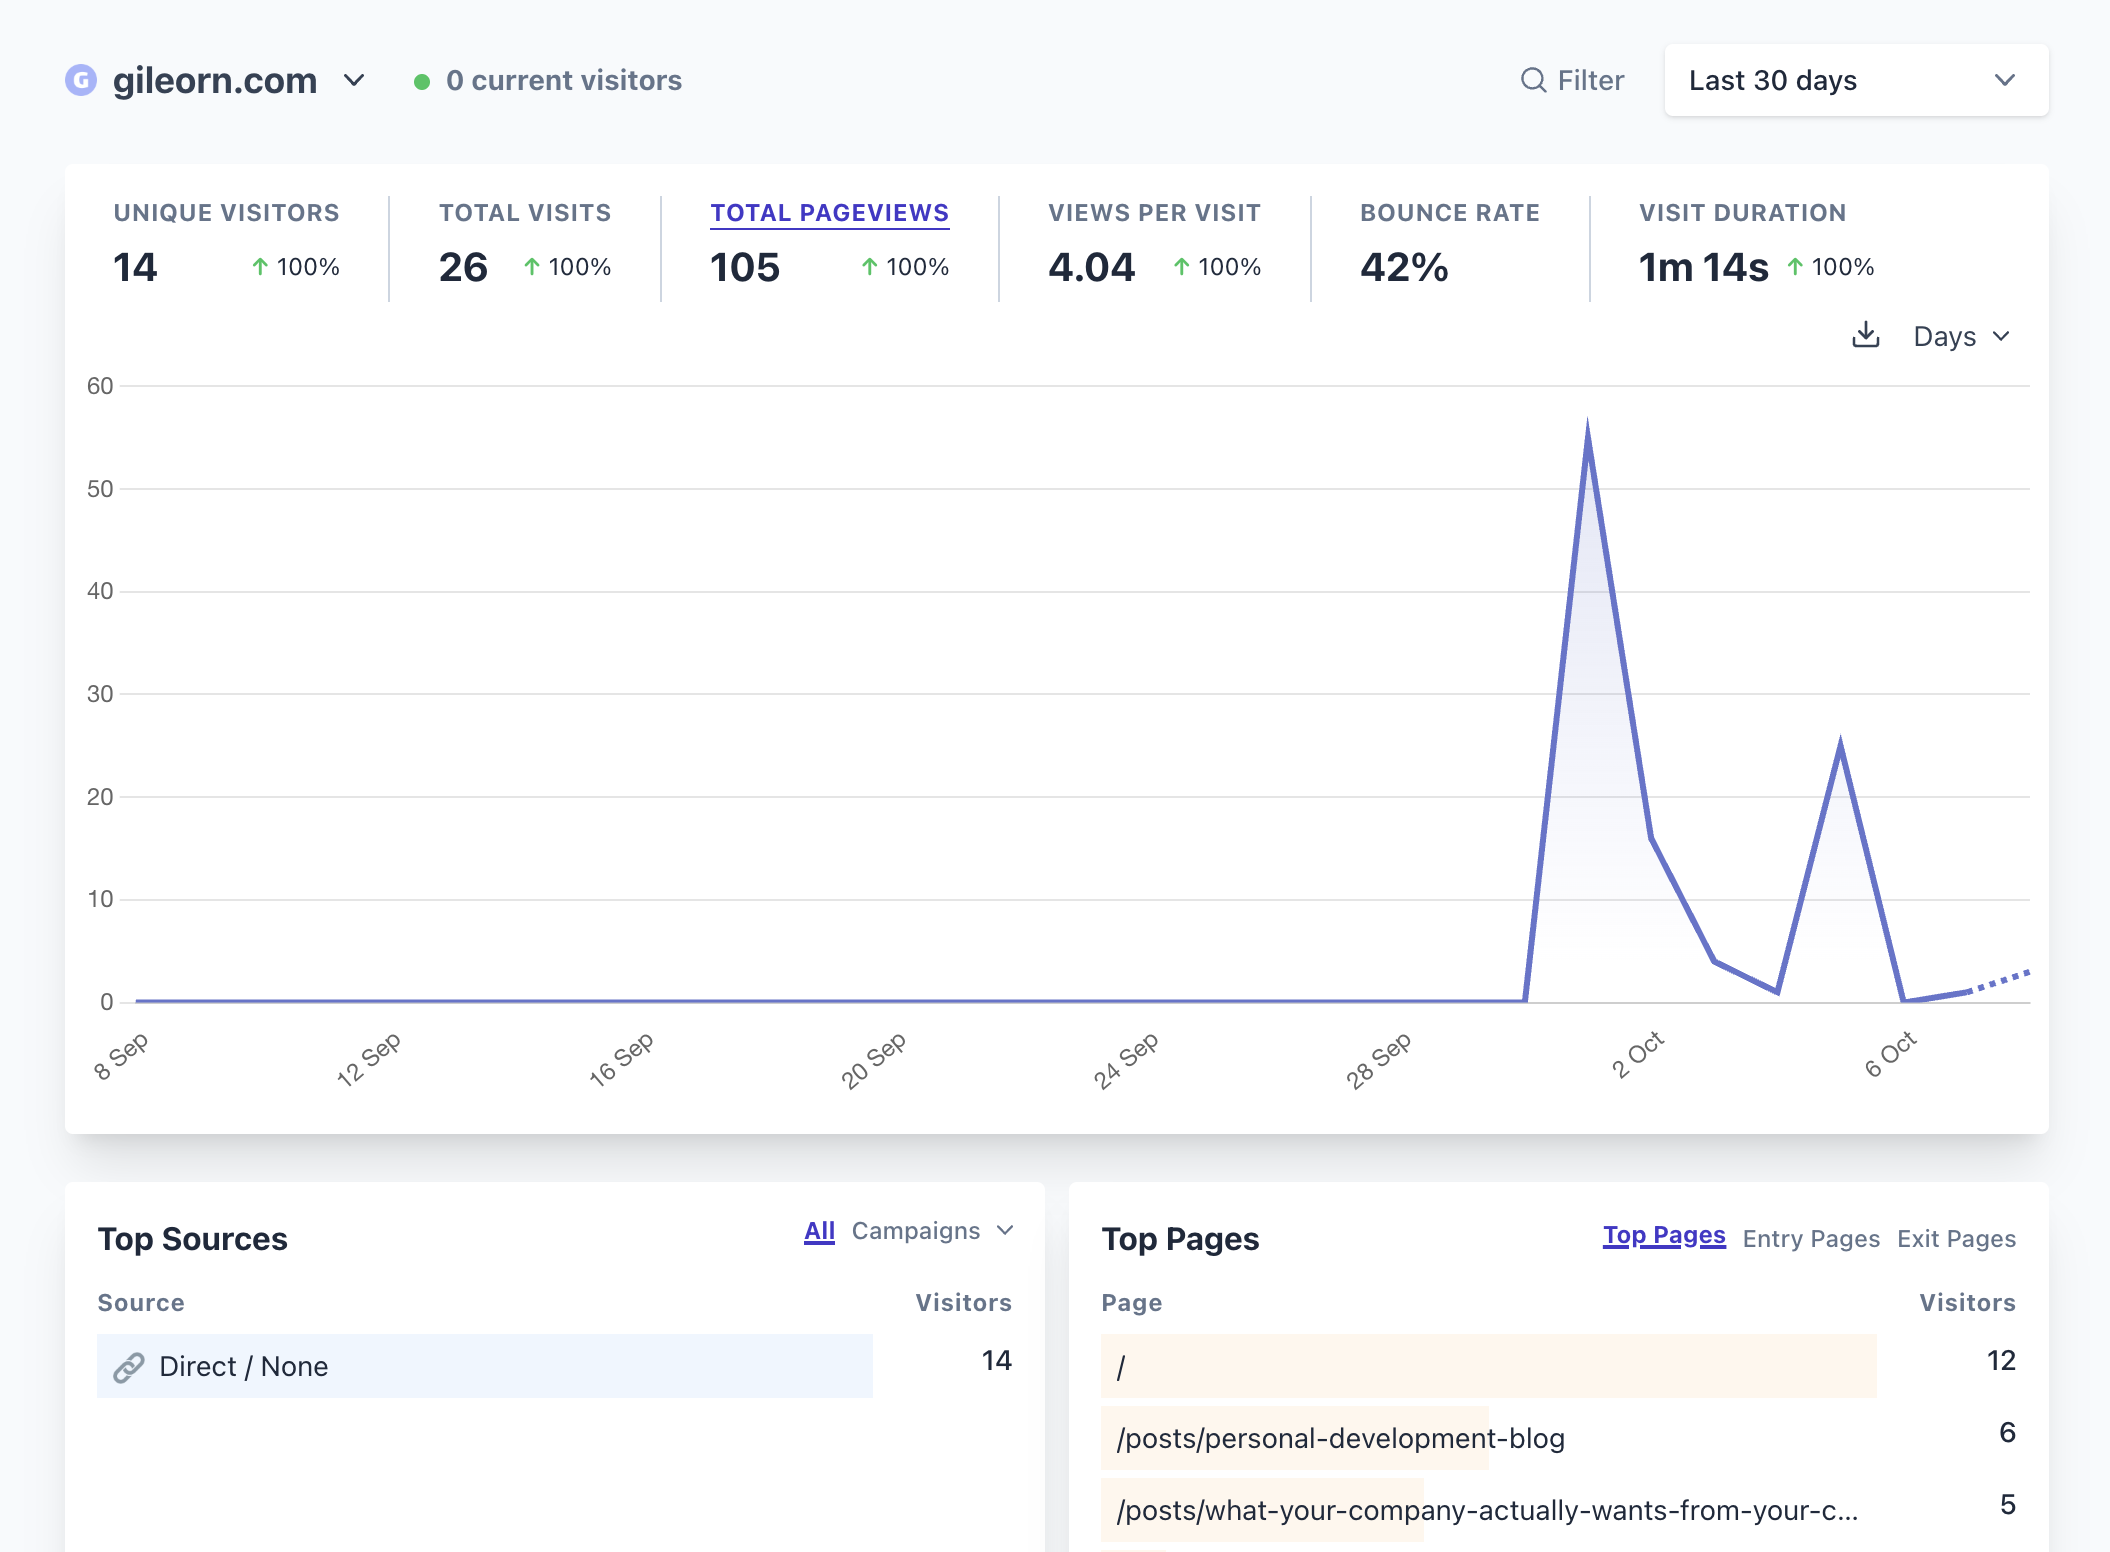
I ended up integrating Plausible in my blog with this npm package that is suggested for Next.js apps. It provides a simple way of using the Plausible integration and the ability to proxy all analytics events through your app so that Adblock does not block them.
Next steps#
Get rid of NextUI component library#
NextUI helped me out a lot during the first stage of my development, but when I needed to fine-tune some components, I spent too much time diving deep into how these components are built and understanding what options for customization are there. Not to mention that I've found annoying bugs even though I'm using only several components from the library. Generally, I feel positive about NextUI, and I'm grateful to maintainers, but I feel like for this small blog, it would be easier for me to create several components I need from scratch just the way I want and not use UI library trying to customize it. The other option is to use a headless UI library like Radix UI and create the representational part of the components.
Self-host Highlight for error-tracking and Plausible for analytics#
While Highlight has a free tier that should be more than enough for this blog, Plausible has a 30-day trial and no free tier, so soon it will cost me 10 euro per month, which is definitely a thing I want to avoid and instead pay 2-3 eur per self-hosted version on AWS. This point is of my highest priority and interest since I wanted to dive deep into Docker for a long time but didn't have any practical cause for that. Now it is time, and I'm looking forward to it.
Minor improvements and further development#
Aside from the things mentioned above, here are some things I treated as not essential and I'm planning to add in the near future after the launch of this blog:
- Appearances page
- Bookmarks page with books, articles, and talks recommendations
- Posts page with tags, filtering, and pagination
- Career section: CV, job history, projects and other stuff
- Native comments section with comments count on posts listing page
- Fullscreen image view in a modal window
- Collapsable code blocks with previews to save space for large code blocks
- Improved post sidebar with collapsable sections and a share button
Conclusion#
I couldn't imagine creating a personal dev blog would bring so much new knowledge and perspective. By my rough estimation, I spent around 60 hours from start to finish, including exploring all these new tools I mentioned above and even completing a course on database basics. This inspired me for further development, and I finally created a platform where I can share my experience and fully own everything I create. This new kind of fundament was required for my further career development, and I'm glad I found enough time and motivation to finish it.
If you've read this long article to the end, thanks for your time. I hope my experience can help you build your own blog, or at least you found this overview useful and interesting. Don't hesitate to leave your comments below in the comment section, and let me know if there are any alternatives to my solutions!